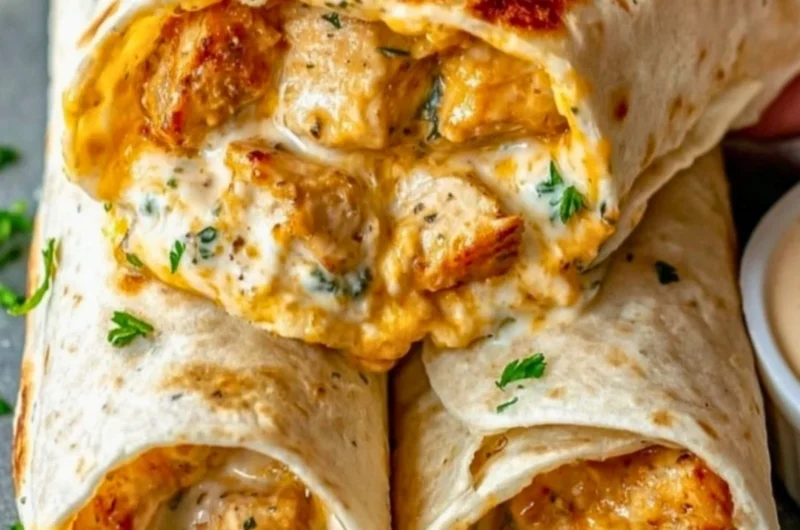
Cheesy Garlic Chicken Wraps: A Cozy Culinary Embrace
There’s something undeniably comforting about a warm, cheesy wrap fresh off the skillet, isn’t there? It reminds me of rainy afternoons spent curled up on the couch, a warm blanket draped over my legs, with the aroma of a hearty meal filling the air. Cheesy Garlic Chicken Wraps are that kind of dish — simple and satisfying, yet packed with flavor that can make even the dreariest day feel a little brighter. When you’re in need of an easy weeknight dinner or a cozy weekend lunch, these wraps deliver on both taste and warmth.
This recipe has nestled itself deep in my heart as a go-to for family gatherings. It’s quick to prepare, and believe me, there’s nothing better than watching everyone’s eyes light up when they take that first melty bite. Today, I’m excited to share how to create these delightful wraps, complete with a few personal twists and tips for perfecting your dish. This is one you’ll definitely want to pin for later!
Why You’ll Love This Recipe
- Quick and Easy: Perfect for busy weeknights, this recipe can be whipped up in less than 30 minutes, making it an ideal choice for an easy weeknight dinner.
- Family-Friendly: Cheesy Garlic Chicken Wraps are a crowd-pleaser, satisfying even the pickiest of eaters.
- Customizable: With various toppings and ingredient swaps, each family member can build their own perfect wrap.
- Comfort Food: Rich cheese and tender chicken wrapped in warm tortillas deliver that essential cozy feeling we all crave.
- Great for Leftovers: They store beautifully, making lunch the next day a delicious treat to look forward to!
Ingredients You’ll Need for Cheesy Garlic Chicken Wraps
- 2 cups cooked chicken, shredded
- 1 cup shredded cheese (cheddar or mozzarella)
- 1 tablespoon minced garlic
- 1 teaspoon dried herbs (such as oregano or basil)
- 4 large tortillas or wraps
- Salt and pepper to taste
- Optional toppings: lettuce, tomato, or avocado
Let’s Make It Together
- In a mixing bowl, combine the shredded chicken, cheese, minced garlic, dried herbs, salt, and pepper. Stir until everything is well-coated and beautifully mixed.
- Lay the tortillas flat and portion the chicken mixture onto each tortilla, ensuring an even spread for maximum melty goodness.
- Roll up the tortillas tightly to form wraps, making sure to tuck in the sides as you go to keep all the delightful filling inside.
- If desired, grill or toast the wraps on a panini press or skillet until the cheese is melted and the wraps are golden brown, creating that irresistible crispy exterior.
- Slice in half and serve warm with your choice of optional toppings for a burst of freshness.
Delicious Variations to Try
- Spicy Chicken Wraps: Add some diced jalapeños or a sprinkle of cayenne for a zesty kick.
- Vegetarian Version: Swap the chicken for sautéed mushrooms or a medley of roasted vegetables for a rich and hearty option.
- BBQ Twist: Mix some smoky barbecue sauce into the chicken filling for a tangy, flavor-packed wrap.
- Mediterranean Style: Try adding chopped olives, feta cheese, and fresh spinach for a refreshing Mediterranean vibe.
Chef Emma’s Helpful Tips
- Make Ahead: You can prepare the filling a day in advance, making your wrap assembly a breeze during busy evenings.
- Ingredient Swaps: Feel free to use rotisserie chicken to save time, or substitute other cheeses based on what you have on hand.
- Slicing Tips: Use a serrated knife to slice your wraps cleanly after cooking for that perfect presentation.
- Storage Suggestions: Leftover wraps can be stored in an airtight container in the refrigerator for up to 3 days. Reheat on a skillet for best results!
Nutrition Information per Serving
- Serving Size: 1 wrap
- Calories: 350
- Carbohydrates: 36g
- Sugar: 2g
- Fat: 15g
- Protein: 24g
- Sodium: 650mg
Frequently Asked Questions
- Can I make this ahead? Yes! Prepare the filling in advance and assemble the wraps when ready to serve.
- Can I use different ingredients? Absolutely! Feel free to swap chicken for turkey or even tofu for a vegetarian option.
- How do I store leftovers? Store any leftovers in an airtight container in the fridge for up to 3 days.
- How long does it last? Ideally, enjoy these wraps within 3 days for the best taste and texture.
Wrapping It Up
Cheesy Garlic Chicken Wraps are more than just a meal; they’re a hug on a plate, offering warmth and comfort with every bite. Whether you’re cozying up for a family movie night or need a quick meal solution, these delightful wraps are your answer. Each bite is filled with cheesy goodness and the flavorful essence of garlic, making it a perfect addition to your recipe collection. Save this Cheesy Garlic Chicken Wraps recipe to your cozy meals board so it’s ready when you need a delightful treat!

Cheesy Garlic Chicken Wraps
- Total Time: 25 minutes
- Yield: 4 servings 1x
- Diet: None
Description
Warm and cheesy wraps filled with shredded chicken and garlic, perfect for any cozy meal.
Ingredients
- 2 cups cooked chicken, shredded
- 1 cup shredded cheese (cheddar or mozzarella)
- 1 tablespoon minced garlic
- 1 teaspoon dried herbs (such as oregano or basil)
- 4 large tortillas or wraps
- Salt and pepper to taste
- Optional toppings: lettuce, tomato, or avocado
Instructions
- Combine the shredded chicken, cheese, minced garlic, dried herbs, salt, and pepper in a mixing bowl. Stir until everything is well-coated and beautifully mixed.
- Lay the tortillas flat and portion the chicken mixture onto each tortilla, ensuring an even spread for maximum melty goodness.
- Roll up the tortillas tightly to form wraps, making sure to tuck in the sides as you go to keep all the delightful filling inside.
- Grill or toast the wraps on a panini press or skillet until the cheese is melted and the wraps are golden brown.
- Slice in half and serve warm with your choice of optional toppings for a burst of freshness.
Notes
You can prepare the filling a day in advance for ease. Leftover wraps store well in an airtight container in the refrigerator for up to 3 days.
- Prep Time: 10 minutes
- Cook Time: 15 minutes
- Category: Main Course
- Method: Grilling
- Cuisine: American
Nutrition
- Serving Size: 1 wrap
- Calories: 350
- Sugar: 2g
- Sodium: 650mg
- Fat: 15g
- Saturated Fat: 7g
- Unsaturated Fat: 5g
- Trans Fat: 0g
- Carbohydrates: 36g
- Fiber: 2g
- Protein: 24g
- Cholesterol: 70mg