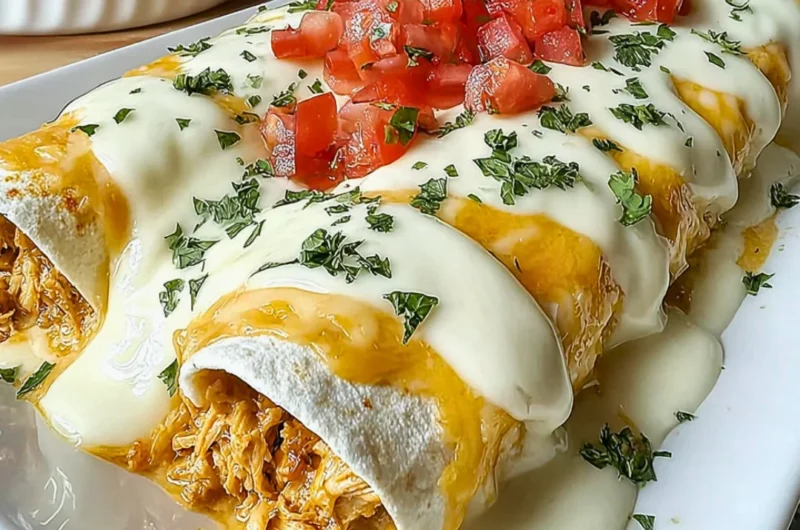
Creamy Queso Chicken Enchiladas for Effortless Family Dinners
When the days grow shorter and the evenings crisp up in a snug embrace, there’s nothing quite like the warm, comforting aroma of a delectable dinner wafting through your home. I can still remember the enchanting weekends spent in my grandmother’s kitchen, where every ingredient was wrapped in love and every dish brought our family closer together. Those golden moments inspired this recipe for Creamy Queso Chicken Enchiladas, a sumptuous creation that effortlessly melds rich flavors with the ease of preparation, making it perfect for those busy weeknights when time may not be on your side. It’s not just food; it’s a cozy hug for the soul, ideal for creating joyful memories around the dinner table. If you are searching for an easy weeknight dinner that your whole family will adore, this one is for you! This is one you’ll definitely want to pin for later!
Why You’ll Love This Recipe
- Quick and simple: With just a handful of ingredients, you can whip up this crowd-pleasing dish in no time.
- Family-friendly: These creamy enchiladas are a hit with both kids and adults, making them perfect for busy weeknights.
- Versatile ingredients: You can easily swap out proteins and cheeses, customizing them to suit your family’s preferences.
- Comforting flavors: The rich, creamy queso sauce smothers tender chicken for a meal that feels indulgent yet effortless.
- Make-ahead option: Prep them in advance and bake when you’re ready for a delicious home-cooked meal without the fuss.
Ingredients You’ll Need for Creamy Queso Chicken Enchiladas for Effortless Family Dinners
- 2 cups Shredded Chicken (Substitute with shredded beef or turkey if desired.)
- 1 packet Taco Seasoning (Store-bought or homemade for convenience.)
- 1 cup Sour Cream (Greek yogurt can be used as a healthier substitute.)
- 1 cup Shredded Cheddar Cheese (Monterey Jack or Pepper Jack for a spicy twist.)
- 1 can Chopped Green Chilies (Diced jalapeños can be used for more heat.)
- 1 package Velveeta Cheese (Cream cheese can be used, though the flavor may differ.)
- 1 can Diced Tomatoes with Green Chilies (Fresh tomatoes or tomato sauce can work as alternatives.)
- 8 Tortillas (Gluten-free tortillas available for gluten avoidance.)
Let’s Make It Together
- Preheat your oven to 350°F (175°C) and gather your ingredients, allowing your kitchen to fill with excitement for the upcoming flavors.
- In a large mixing bowl, combine the shredded chicken with the taco seasoning, sour cream, and half of the shredded cheddar cheese. Give it a good stir until all the ingredients are fully combined and coated with the creamy goodness.
- Stir in the chopped green chilies and half of the Velveeta cheese, letting the mixture meld into a dreamy filling.
- Spread a thin layer of the diced tomatoes with green chilies at the bottom of a 9×13 inch baking dish, creating a flavorful base for the enchiladas.
- Place a generous scoop of the chicken mixture in the center of each tortilla, rolling them up tightly and placing them seam-side down in the baking dish.
- Once all the enchiladas are nestled in, pour the remaining diced tomatoes over the top and sprinkle with the rest of the Velveeta cheese and cheddar cheese. Embrace the cheesiness!
- Cover the dish with foil and bake for 25 minutes, then remove the foil and bake for an additional 15 minutes, or until the cheese is bubbling and golden.
- Let the enchiladas rest for a few minutes before serving, inviting everyone to gather around the table for a cozy feast.
Delicious Variations to Try
- Spicy Kick: Add some diced jalapeños or your favorite hot sauce to the chicken mixture for an extra layer of heat and flavor.
- Veggie Delight: Swap out the chicken for a medley of sautéed bell peppers, onions, and mushrooms for a fully vegetarian version.
- Tex-Mex Twist: Sprinkle some fresh cilantro or green onions on top before serving for a burst of freshness.
- Gourmet Touch: Drizzle with a homemade avocado crema or top with fresh avocado slices for that creamy, luxurious finish.
Chef Emma’s Helpful Tips
- Make-Ahead: You can prepare these enchiladas a day in advance! Just assemble them, cover tightly, and store them in the fridge. Bake them right before dinner for a hassle-free meal.
- Ingredient Swaps: Feel free to use leftover holiday turkey or even rotisserie chicken to save some cooking time.
- Slicing Tricks: To make rolling tortillas easier, warm them briefly in the microwave or place them in a hot pan for a few seconds to soften.
- Storage Suggestions: Leftover enchiladas can be refrigerated for up to three days. Reheat in the oven at 350°F for about 15-20 minutes until heated through.
Nutrition Information per Serving
- Serving Size: 1 enchilada
- Calories: 350
- Carbs: 28g
- Sugar: 3g
- Fat: 20g
- Protein: 22g
- Sodium: 600mg
Frequently Asked Questions
Can I make this ahead?
Yes! You can assemble the enchiladas the day before, cover and refrigerate, then simply bake when you’re ready to eat.
Can I use different ingredients?
Absolutely! Feel free to swap the chicken for shredded beef or turkey, and switch out the cheeses to suit your family’s tastes.
How do I store leftovers?
Store any leftovers in an airtight container in the refrigerator for up to three days.
How long does it last?
If properly stored in the refrigerator, these enchiladas will stay fresh for about three days. You can reheat them in the oven for the best texture.
Wrapping It Up
This Creamy Queso Chicken Enchiladas recipe encapsulates the warmth of home-cooked goodness with every tender bite. Perfect for those busy evenings or a cozy family gathering, these enchiladas are truly a blend of nostalgia and comfort. Your loved ones will appreciate the effort and savor the rich flavors that speak of togetherness. Save this Creamy Queso Chicken Enchiladas for Effortless Family Dinners to your Pinterest board so it’s ready when you need a cozy treat! Happy cooking!